
So you want to become a voice actor! Yeah, me too! I started the process about a couple years ago, and I’m still learning as much as I can, as often as I can. The question I get asked most often is, “How do you start?”
My answer: Take classes, become an actor, just do it.
Voice acting, like any skill, has to be developed through a two-pronged attack 1) acquire knowledge, 2) apply knowledge (practice). Today, I’ll be concentrating on that second point: Practice. How does a voice actor practice? Procure copy. Record it with your recording studio. Analyze where you can improve. Wait, you’re right, I skipped something. You need a recording setup! Thankfully, these days a decent home recording setup will cost you hundreds of dollars, as opposed to the thousands it used to cost 10 or 20 years ago.
I’ll be covering a cost-effective startup recording setup that will hopefully leave you some room to grow. You’ll be able to practice as much as you’d like without having to rent studio time, and also record auditions when you’re ready. Like with my guide on buying an acoustic guitar, this is all about a nice balance of price point and quality.
Microphone
Your recording setup is centered around a microphone, of which you have two options:
1) a USB mic – Cheaper overall, but won’t give you quite as clean of a recording, due to lower signal-to-noise ratio, which is probably caused by having to cram all the preamp/analog-to-digital converter circuitry in the microphone itself. Most people, however, may not even notice the difference. Probably more convenient for working on the go.
2) an XLR mic – More expensive, because of the need to buy additional hardware, but you will get a cleaner sound because of the reason stated above. Also, if you decide to trade up in the microphone department, you can keep the rest of your setup as is. Nifty. You’ll hear the cables and connectors referred to as an XLR or balanced connection. If you’ve looked into the end of most microphones, you’ve seen a three-prong connector that hooks up to the microphone cable. That’s XLR.
The rest of your gear will depend on which you choose. Both are condenser mics, as opposed to the dynamic microphones that you see live-performers use. Because of the way condenser microphones capture and transmit sound waves, they are much more sensitive than dynamic mics.
If you go with a USB mic your setup will look like this:
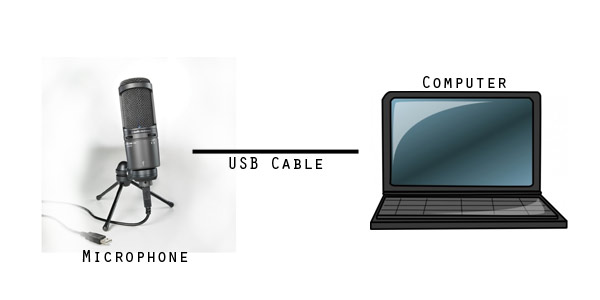
As you can see, all you need is the mic and computer. The microphone plugs directly into one of your computer’s USB ports.
If you go with an XLR mic, it’ll look like this:
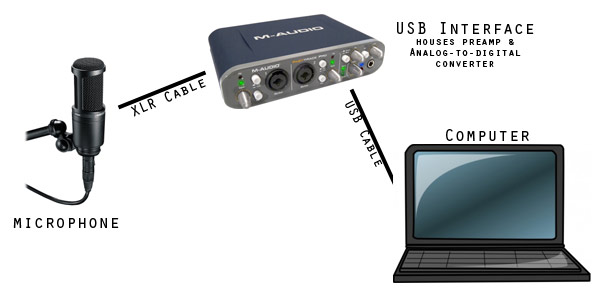
A few more pieces of hardware are required here. You need an XLR cable and a USB audio interface.
Examples:
USB: Blue Yeti – Amazon | Sweetwater
- Comes in Silver, Platinum, and Pro trims
- Sub-$100 for most trims
- Headphone jack for zero-latency monitoring
- Pro version also has XLR capabilities
- Multiple pickup patterns, including omni-directional (good for multiple people, i.e. podcasting)
- Easy setup
- Not compatible with most shock mounts
XLR: Audio Technica AT2020 – Amazon | Sweetwater
- No frills, side address condenser
- More sensitive than the Yeti
- Better signal-to-noise ratio
- Also comes in USB version
- Compatible with more shock mounts
Which is right for you? Your choice really. Keep in mind that your voice might be complimented better by different mics. Best to A-B them with you own voice if you get the chance.
Audio Interface
Remember, you only need one of these if you’re going for the XLR mic option. The function of one of these is to convert the signal from your mic from an analog signal to a digital one that your computer can recognize. Also, condenser mics require a power source.The interface also does that via Phantom power, which allows it to transmit voltage through the microphone cable. Finally, they usually a built-in preamp, which boots the signal being received from the microphone.
You could go a couple routes with the audio interface. There’s the super compact, single input, no-frills option, like the Shure X2U XLR to USB Adapter or something like the Avid Fast Track Duo. The Avid has multiple inputs, in case you wanted to record audio from multiple sources at the same time, both voice and guitar for example. Both have headphone outputs for monitoring.
Basically, you plug your microphone into one end of the interface with a male-to-female XLR cable, then connect the other end of the interface to your computer with a USB cable. Relatively easy peasy.
Other Products:
Focusrite Scarlett 2i2
CEntrance MicPort Pro
Software
Some interfaces like the ones mentioned above come with their own recording software, usually a stripped down version of ProTools. If yours doesn’t, however, there are a few free, easy to use options out there. If you’re using a Mac, you probably have Garageband installed on your machine. I don’t know too much about that, though.
If you’re using a PC, you’ve got a couple of free programs to choose from. There’s Audacity, which is a rather popular option. This is what I use. I find it rather intuitive. But, if everything in Audacity seems out of place to you, theres also Wavosaur. I’ve never used the latter, but someone in a voice acting forum I frequent was quite adamant about it over Audacity, so I figure I should mention it. Again, both are free.99!
Extras
Pop Filter
This is that vaguely tennis racket-shaped, mesh apparatus you see clipped onto a mic stand that sits in between a the mic and a performer’s mouth. What this does is cut down on all the “plosive” sounds that might come from a performer enunciating hard ‘p’, ‘d’, or ‘k’ sounds. They’re indispensable in my opinion.
Example:
On-Stage Stands Pop Filter
Flat Response Headphones
These are basically headphones that don’t favor a certain frequency of sound. When you buy most headphones not meant for recording purposes, they tend to favor a certain portion of the sound spectrum. For example, a lot of headphones today advertise their bass response. This isn’t always good for recording. Let’s say you’re wearing a set of overpriced Beats by Dre headphones (gross) with huge bass response. Your recording might sound like it has tons of low end, but when someone listens to it on a regular set of earbuds, it might sound tinny. That’s why you want a set of cans with a flat response curve. Listening to your recording through them will give you a truer idea of what your recording will sound like on other setups.
Examples:
Superlux-HD668B
Sony MDR-V6
Sennheiser HD-280 Pro
Shock Mount
Depending on how you plan to set up your recording station, you might want to invest in a shock mount. Instead of mounting your microphone directly on to a floor stand or desk stand, you would mount it to a shock mount, and then onto the stand. A shock mount is basically saddle, which holds the mic, surrounded by a ring of elastic bands that absorb the vibration, and therefore minimize the sound of any bumps into the mic stand or the desk the stand might be sitting on. Alternatively, I know some people place a folded up towel or other soft cloth under their desk stand.
Examples:
Samson SP01 Shock Mount
Audio Technica AT8458 Shock Mount
Microphone Stand
These come in a few different flavors. As you can see, the microphones I’ve suggested come with their own table stands. If, however, you elect to put the mics on a shock mount, you would have to find an alternative stand. Too, you could go for the a floor stand with a boom, like this. This is what I’d recommend, as it’s more versatile in terms of positioning than either a desktop stand or a straight mic stand.
Acoustic Dampening
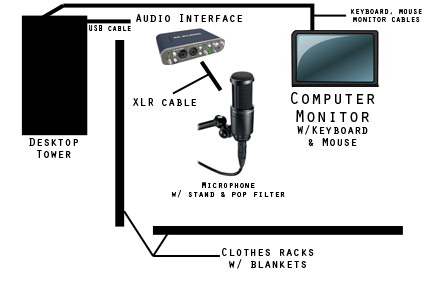
Now that you’ve got your recording gear set up, it’s time to create a makeshift whisper room or recording booth. Basically, you want to create a space with as few hard surfaces as possible for sound to bounce off of and cause an echo. There are a few ways to accomplish this, one of the more expensive being acoustic foam. I know of people, however, using a clothes rack similar to this. They drape heavy blankets over them to capture any errant sound waves. Also, you want some place that doesn’t let a lot of ambient sound in. I’ve heard of people use their closets in a pinch. Lots of hanging clothes, so most of the echo is dampened, also, there usually aren’t any noise sources in a closet, like a refrigerator or air conditioner so that makes it somewhat ideal.
Speaking of noise sources, it kinda helps to have a quiet computer, like a laptop running on low speed so the fan doesn’t kick in. Or, you could isolate your desktop tower from your recording space, then run your monitor inside the booth with you with your keyboard and mouse. In the end, your setup is gonna be similar to this, I suppose:
Any questions or violent reactions? Feel free to leave a comment below! Get to practicing!